Since it first launched in 2004, Facebook has been a great resource for people looking to present their products and services to a targeted audience. However, as social media and digital selling have continued to intersect over the years, it’s become clear that these platforms are more than just marketing tools — they are powerful eCommerce marketing channels in their own right. This post explains how to start selling on Facebook.
As the popularity of eCommerce continues to skyrocket in Canada, it’s safe to say that the ‘social commerce’ trend is not going anywhere soon.
Regardless of whether you’re social media-savvy or not, selling on Facebook has never been easier. It’s no wonder it’s a popular choice for a wide range of businesses — from big-name brands like Roots Canada and Aritzia, to smaller retailers like Woodlot and Tease Tea.
Nowadays, you don’t even need a Facebook business page. With Facebook Marketplace, all you need to do is take a picture of the item you want to sell, add a price and description and away you go.
Related: What it takes to open an eCommerce business in Canada
The easy way to sell on Facebook
With social media constantly evolving, it’s understandable if you’re not sure where to start. Fortunately, you’ve come to the right place. We’ll start with step-by-step instructions for setting up a Facebook Shop, complete with screenshots.
-
Add a shop section to your Facebook.
-
Set up your store.
-
Add products to your shop.
Then keep reading for details on how to use Facebook Marketplace for local selling — plus our bonus list of Facebook sales tips.
Setting up a Facebook Shop
If you run an online store and are looking to add another sales channel to the mix, consider adding a shop section to your business’ Facebook page.
This is also a great option for anyone looking to test consumer interest in a product before starting a business. With a Facebook Shop, your customers can buy your products directly from the platform.
1. Add a shop section to your Facebook
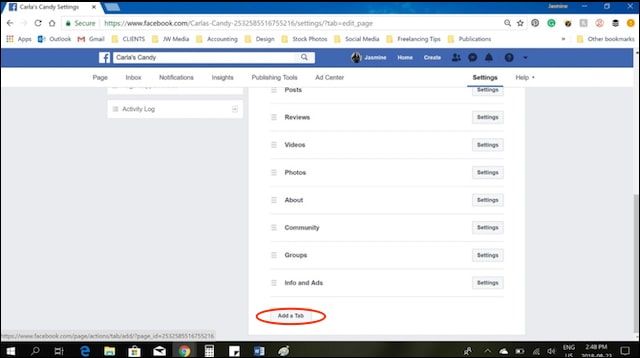
Go to your Facebook page and click Settings in the upper right.
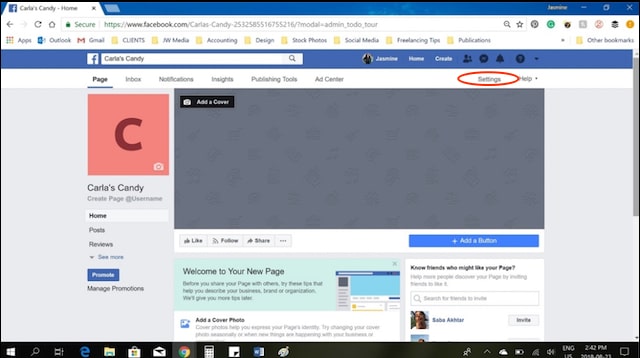
Now click Edit Page.
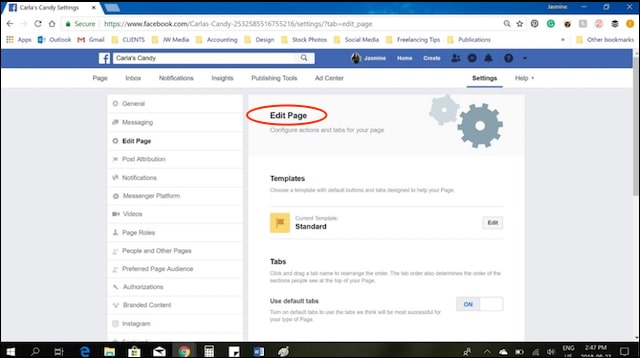
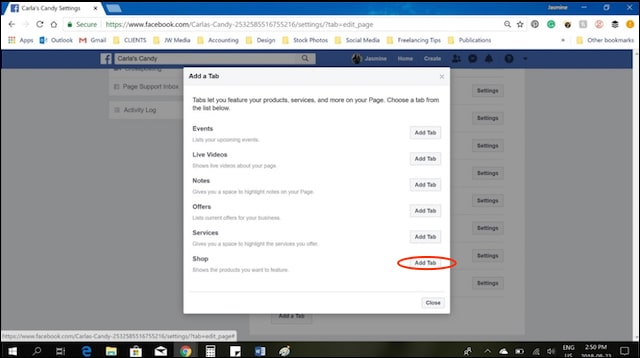
Scroll down to the bottom of the page and click Add a Tab.
Now click the Add Tab button to the right of Shop.
Press Save. Shop created!
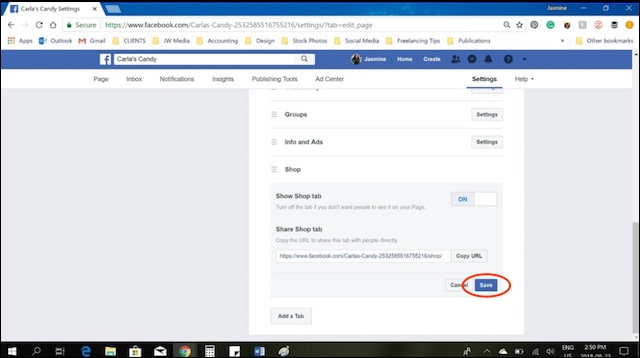
When you go to your Facebook page, you should now see the ‘Shop’ tab at the bottom of the left-hand side menu.
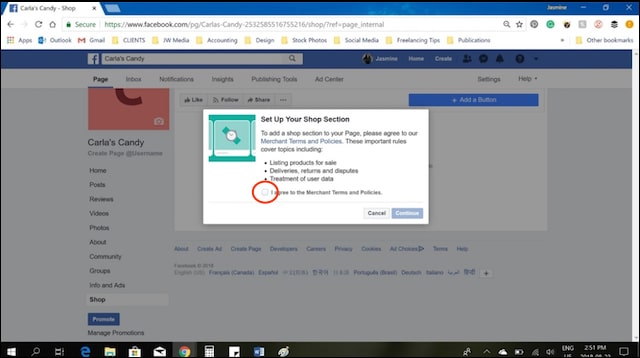
2. Set up your store
Now that you’ve added this feature to your Facebook, you’ll need to set up your shop. Just follow these steps:
Click on the Shop tab and check the ‘I agree’ box for Merchant Terms and Policies.
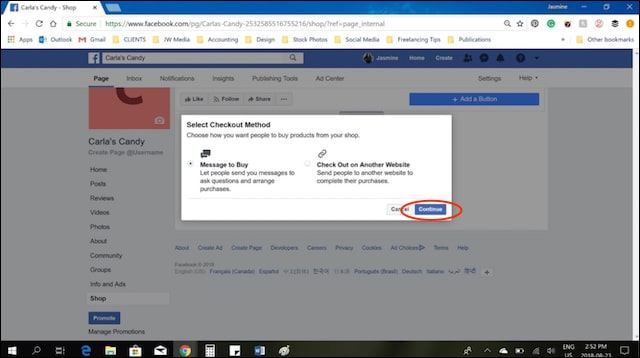
Select the Checkout Method that best suits your business and click Continue.
- ‘Message to Buy’ lets people send you messages to ask questions and arrange purchases.
- ‘Check out on Another Website’ sends people to another website (your own website, Etsy, etc.) to complete their purchases.
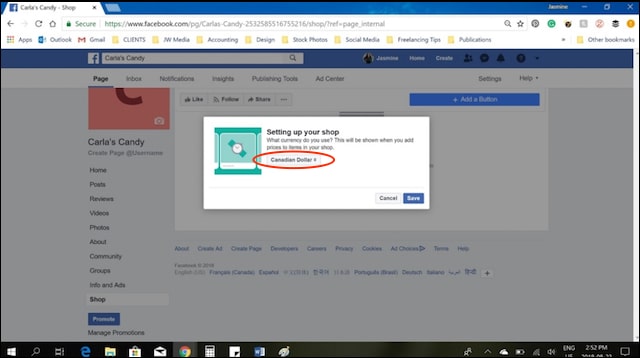
Select a currency and click Save.
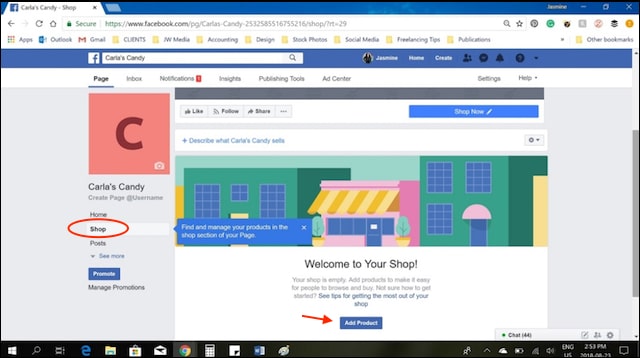
3. Add products to your shop
The final step is to add products to your new Facebook store. To start, go to your Facebook page and click on the ‘Shop’ tab in the left margin. Then click the Add Product button.
Add images of your product (photos or videos) by clicking the appropriate box, then type in the following information:
- Product name
- Price
- Description
Click on the ‘Visibility’ dropdown and select ‘Public.’
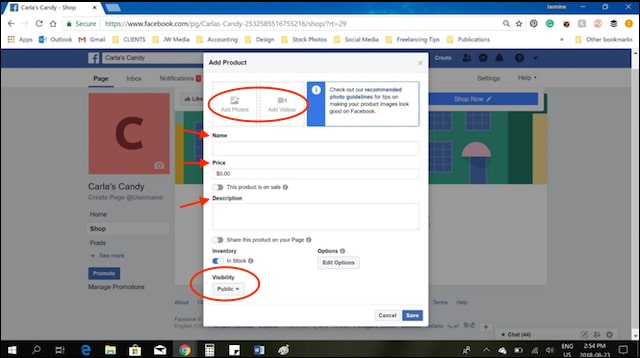
Click Save.
While setting up a Facebook Shop can be great when you’re just starting out, entering products and managing orders one-by-one can quickly become time-consuming once you’re making a lot of sales.
Additional setup options
The good news is, this isn’t the only way to use Facebook as a marketing channel.
Create a Facebook Shop via a paid platform
Another way to set up your Facebook Shop is through an eCommerce platform like Ecwid or BigCommerce.
These platforms automate a lot of tasks, from product entry to shipping updates, which can save you a ton of time. Plus, they allow you to also sell on many different platforms such as:
- Your own website.
- Social media sites like Pinterest.
- Bigger marketplaces like Amazon and eBay.
However, remember that convenience comes at a price — these services typically come with monthly fees.
For local sales: Facebook Marketplace
If you’re an occasional seller rather than a full-on eTailer, Facebook Marketplace is the best place for you.
Facebook Marketplace is aimed at users rather than businesses, so it lacks the professionalism of a Facebook Shop.
Similar to Craigslist or Kijiji, you can sell anything — from clothes and TVs to cars or real estate, and reach thousands of people in your local community. With Marketplace, you don’t even need to create a Facebook page. This new service allows people to buy and sell products in their areas directly within the platform.
To sell an item on Facebook Marketplace:
- Click Marketplace in the left column of your News Feed.
- Click Sell Something.
- Enter product information (example: item, price, your location, a category and description).
- Click Add Photos to upload photos of your item from your computer or mobile. Click Post.
- Once you're selling an item, tap Selling in the top left of Marketplace to keep track of the items you're selling and the conversations you're having with buyers
The downside of Marketplace is that you can’t accept payments like you can with a Facebook Shop. Facebook does allow eCommerce retailers that meet their requirements to make their Marketplace inventory available to people shopping on the platform, but this feature is currently not available outside of the United States.
How to maximize your sales on Facebook
Just like with any store — brick-and-mortar or online — presentation is everything. While Facebook makes it super-easy to set up a Shop or a Marketplace post and start selling, the most successful sellers take the time to dress up their listings.
For instance, Facebook suggests sellers choose product images that are:
- Easy to understand and show the whole product.
- Have a resolution of 1024 x 1024 pixels or higher.
- Are in a square format.
- Show the product up close.
- Have white backdrops.
- Capture the product in real-life situations (e.g. in use).
Sellers should avoid using images that contain text, offensive content (e.g. nudity, explicit language, violence), advertising or promotional material, watermarks and time-sensitive information (e.g. limited-time price drops).
Related: How to take product photos that will help sell your goods
Product descriptions can also make or break a sale. Facebook suggests you:
- Provide only information directly related to the product.
- Make descriptions digestible (e.g. make use of short sentences and/or bulleted lists).
- Highlight unique product features.
- Use proper grammar and punctuation.
HTML, phone numbers or email addresses, long titles and excessive punctuation are all major no-no’s.
Selling on Facebook — it really is easy
Today’s Facebook is so much more than a social network. With easy-to-use tools like Facebook Shop and Marketplace, it’s actually a viable marketing channel — perfect for testing consumer interest in your product or launching an eCommerce business. As long as you use high-quality photos and spend some time crafting informative and engaging product descriptions, you’ll soon be selling on Facebook like an old pro.